

Ana White X Desk With Drawer
Difficulty
Intermediate
| 
Build a X desk with these free easy do it yourself plans! Features step by step instructions, detailed diagrams, cut list and shopping list.
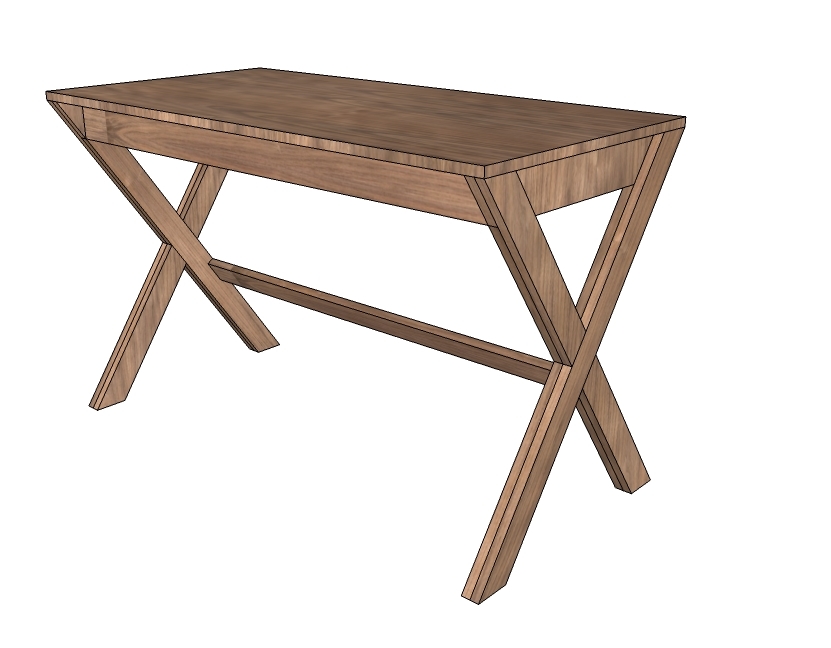
Sometimes the simplest plans are the most difficult to explain - sorry bout the 18 diagrams! But I'm giving my best effort to simplify the every popular X Desk with drawer for you - so you can build it with ease and confidence.

The drawer is optional, definitely increases the complexity of the plan, but certainly doable!
The real trick to this desk is getting the legs just right. Pay careful attention to the cuts and assembly of the legs, and you will have this desk built in no time!
Dimensions
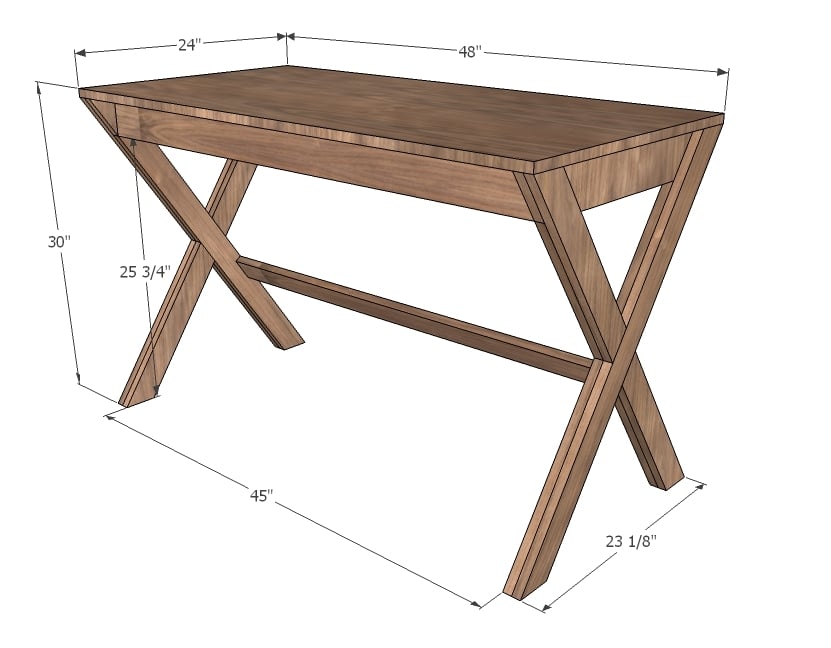
Dimensions are shown above.
Preparation
Shopping List
6 - 1x3 @ 8 feet long - Shop around for 1x3s with very sharp, square edges
1 - 1x4 @ 12 feet long
1 - 3/4" plywood or other project panel 24" x 48" suitable for desktop use
1 - 1/4 sheet 1/4" plywood or hardboard
2 - 16" Euro style drawer slides (the cheap white ones that attach to the bottom corners of the drawers)
Common Materials
2 1/2 inch screws
1 1/4 inch finish nails
120 grit sandpaper
Cut List
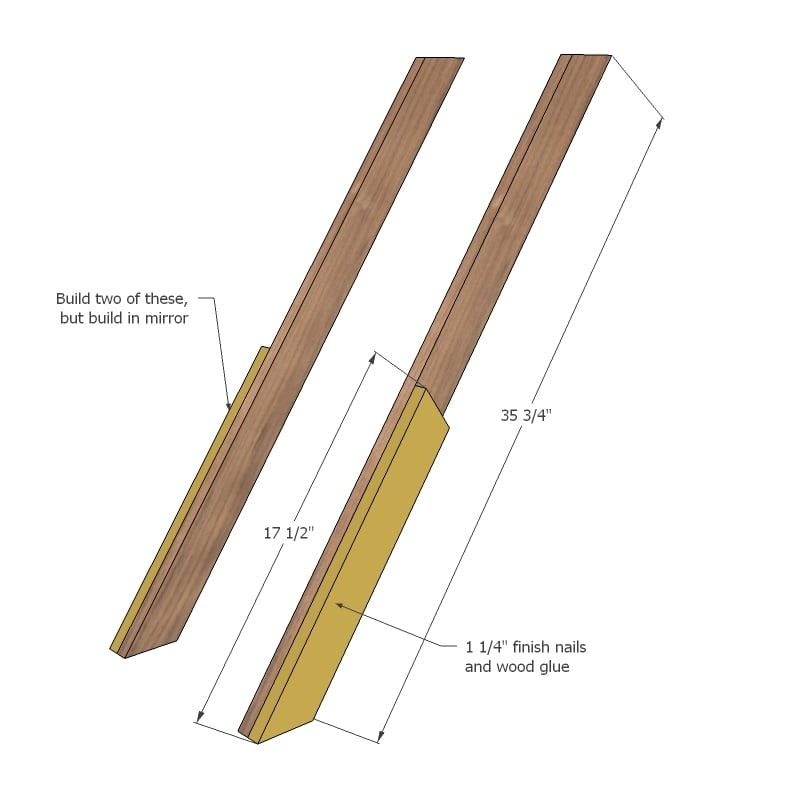
2 - 1x3 @ 35 3/4" - Both ends cut at 35 degrees off square, ends are parallel to each other
2 - 1x3 @ 31 3/8" - Both ends cut at 35 degrees off square, ends are parallel to each other
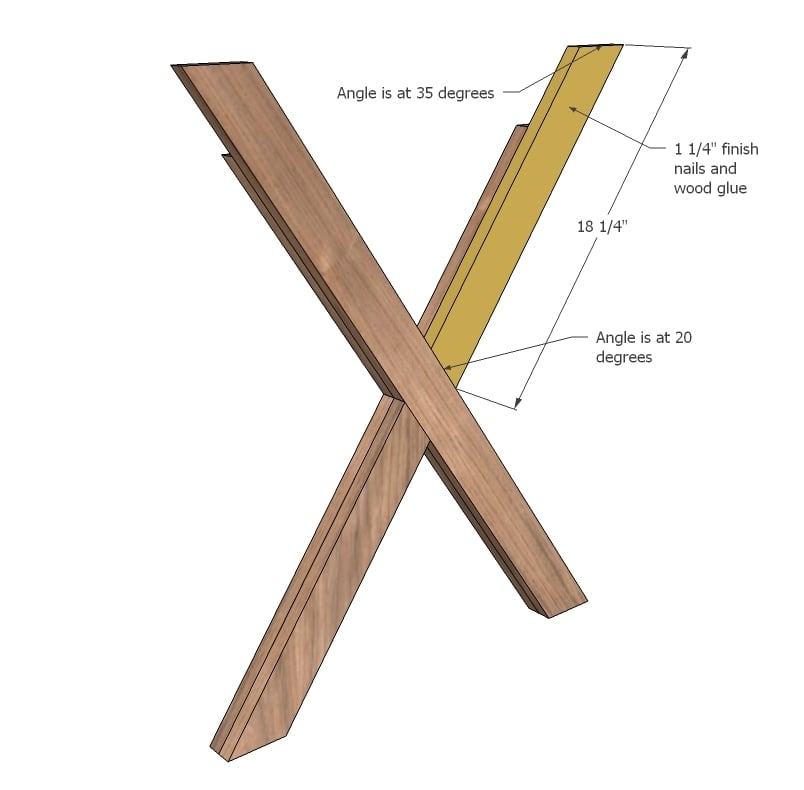
4 - 1x3 @ 17 1/2" - One end cut at 20 degrees off square, other end cut at 35 degrees off square, measurement is longest points - SEE IN STEP 1 AND 2
2 - 1x3 @ 14" - One end cut at 20 degrees off square, other end cut at 35 degrees off square, measurement is longest points - SEE IN STEP 4
2 - 1x3 @ 18 1/4" - One end cut at 20 degrees off square, other end cut at 35 degrees off square, measurement is longest points - SEE IN STEP 5
2 - 1x4 @ 24" - Both ends cut at 35 degrees off square
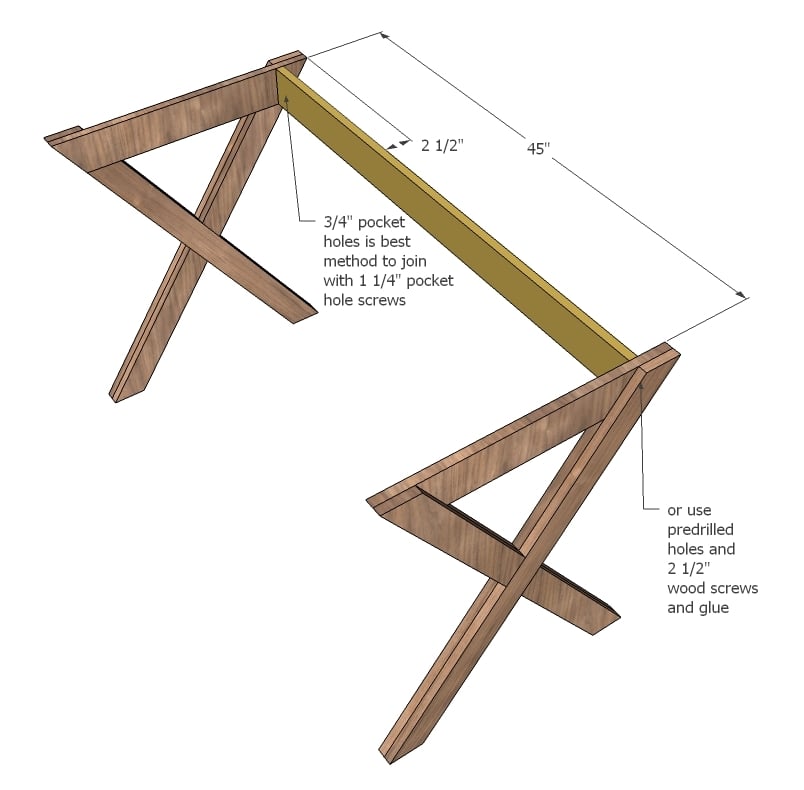
2 - 1x4 @ 45"
1 - 1x3 @ 45"
1 - 1/4 sheet plywood or other project panel 48" x 24"
Drawer
4 - 1x3 @ 15 1/4"
2 - 1x3 @ 12"
1 - 1x3 @ 44"
1 - 1/4" plywood or hardboard @ 44" x 16"
General Instructions
Please read through the entire plan and all comments before beginning this project. It is also advisable to review the Getting Started Section. Take all necessary precautions to build safely and smartly. Work on a clean level surface, free of imperfections or debris. Always use straight boards. Check for square after each step. Always predrill holes before attaching with screws. Use glue with finish nails for a stronger hold. Wipe excess glue off bare wood for stained projects, as dried glue will not take stain. Be safe, have fun, and ask for help if you need it. Good luck!
Instructions
Step 1
It would be a good idea to lay out your legs first. A dry run will minimizes mistakes later.
Start with the two longest leg pieces. Notice you will need to build two leg sets that are mirrored. Attach the 17 1/2" long leg pieces to the bottoms with 1 1/4" finish nails and wood glue. Take great care to line edges up - you want to create the illusion of a solid wood leg here. This will save you sanding work later!
Step 2
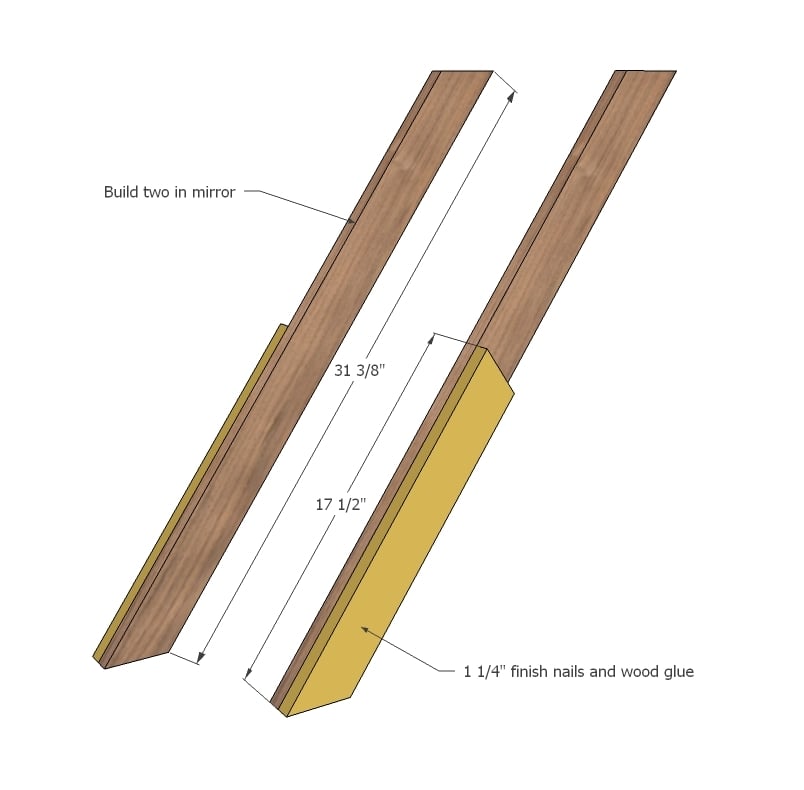
Do the same for the shorter full legs. Note that the middle angles are all 20 degrees off square, but top and bottom angles are 35 degrees off square.
Step 3

Position a leg set including one short and one long leg, crossing in the middle. Check to make sure the bottom overall spread is 23 1/8" exactly. Glue and nail down when satisfied. Build remaining leg in mirror.
Step 4

Fit the long top leg with the remaining short filler piece. Nail down.
Step 5
Step 6

Position the side aprons in this notch and glue and nail down.
Step 7
Notice the side aprons both sit to the inside. Attach back apron as directed in diagram.
For a drawerless desk, simply add the front apron too.
Step 8
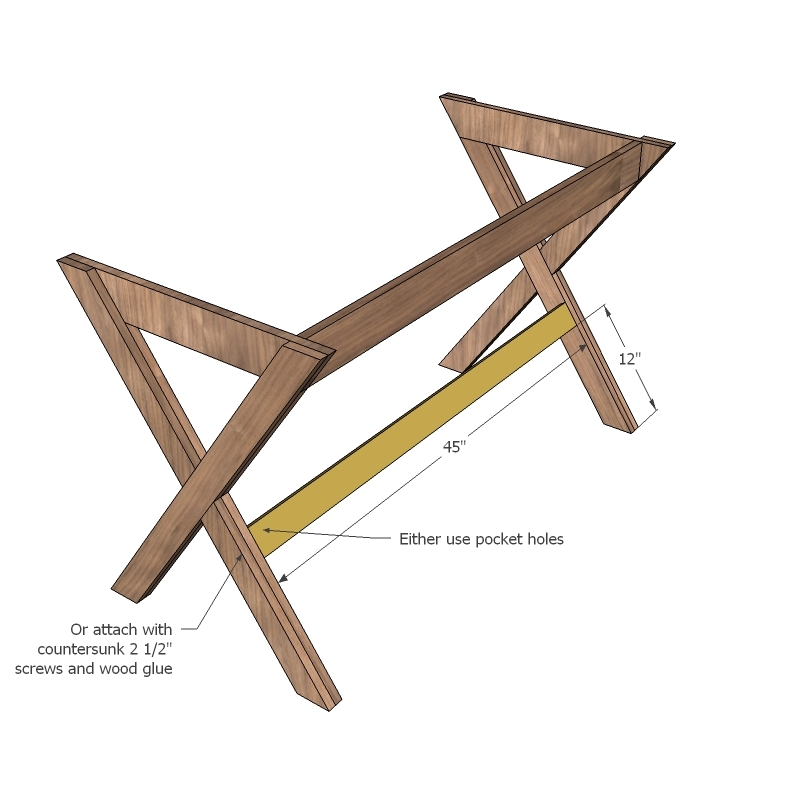
Bottom stretcher is a 1x3. Attach same as back apron.
Step 9

Followed by the tabletop. If you have a pocket hole jig, you will want to attach through aprons with 3/4" pocket holes and 1 1/4" pocket hole screws (drill pocket holes PRIOR to step 7). Otherwise, nails and glue down with 2" finish nails.
Step 10
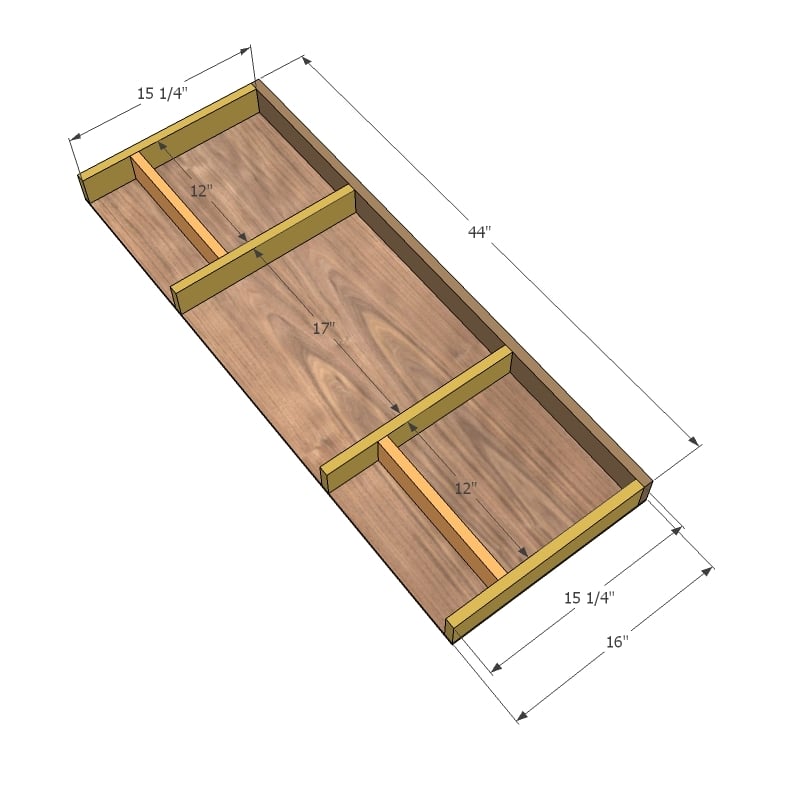
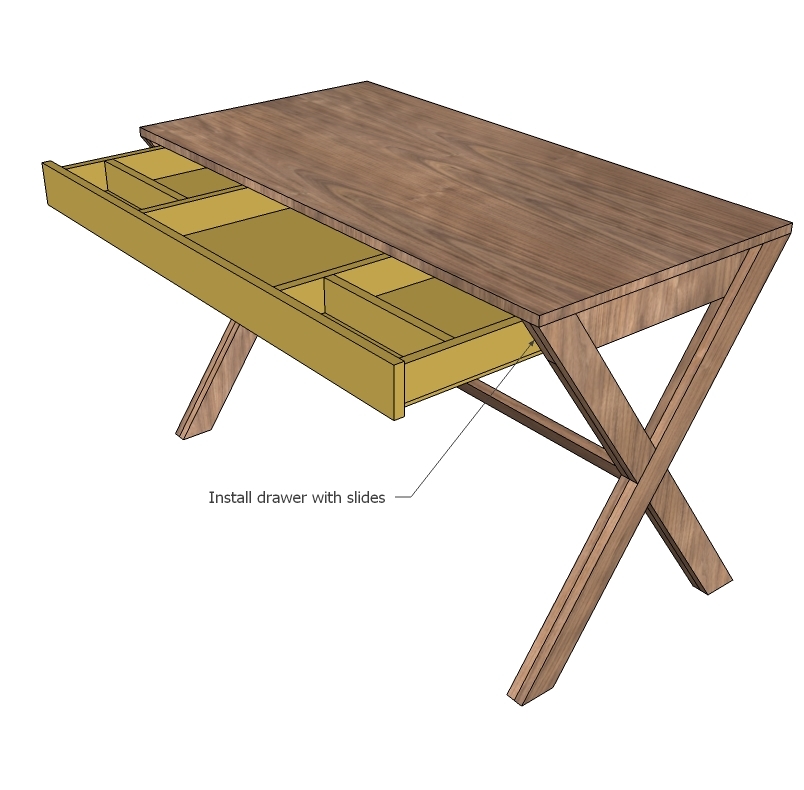
For the drawer, build as shown above. Attach plywood to the bottom with 1 1/4" finish nails and wood glue. Check to make sure your drawer is square and overall 1" less in width than the opening in the desk.
Step 11
Step 12
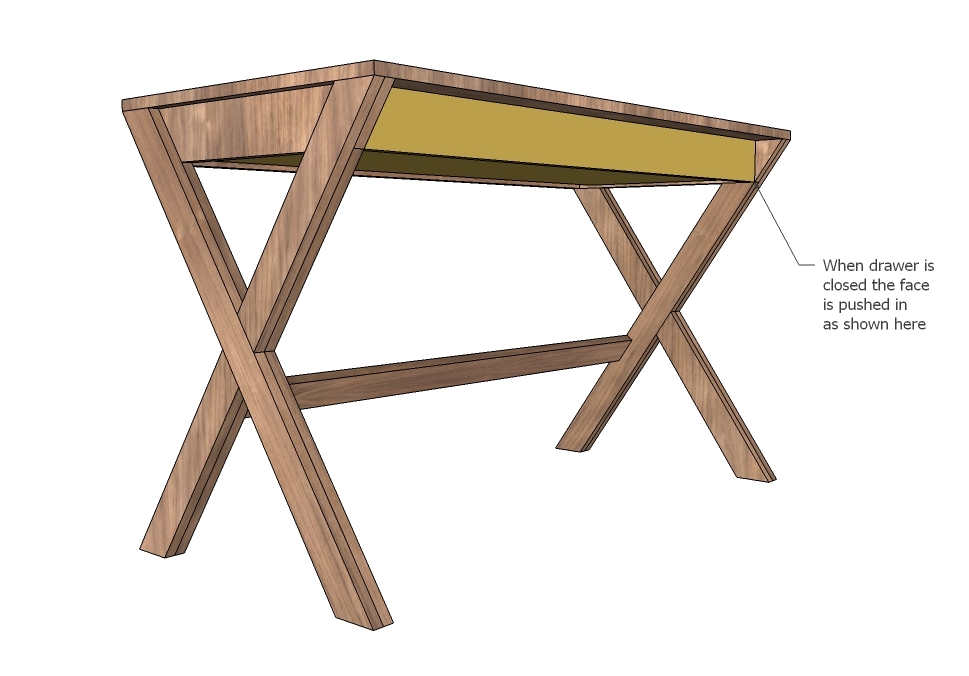
When the drawer is closed, it sits inset on the desk as shown above.
Preparation Instructions
Fill all holes with wood filler and let dry. Apply additional coats of wood filler as needed. When wood filler is completely dry, sand the project in the direction of the wood grain with 120 grit sandpaper. Vacuum sanded project to remove sanding residue. Remove all sanding residue on work surfaces as well. Wipe project clean with damp cloth.
It is always recommended to apply a test coat on a hidden area or scrap piece to ensure color evenness and adhesion. Use primer or wood conditioner as needed.
Ana White X Desk With Drawer
Source: https://www.ana-white.com/woodworking-projects/x-desk-drawer
Posted by: hughesthind1949.blogspot.com
0 Response to "Ana White X Desk With Drawer"
Post a Comment