

How To Create A Server On Garry's Mod
Download and use SteamCMD
Download
First, you need to download SteamCMD, of course. This program is used to install the actual files for your server, and to install the Garry's Mod files.
You can download SteamCMD here.
(Direct download link http ://media.steampowered(.)com/installer/steamcmd.zip)
It is a .zip file. Extract the steamcmd.exe file inside it (extract into its own folder because the files will be installed into the directory of steamcmd.exe), and then run it.
Use
Now, that SteamCMD is ready, we will begin installing the server.
First, you start off by logging in. Type this command in the command prompt that is currently open:
login anonymous
The command prompt should return this information:

After logging in, you have to determine the path where the server will be installed.
To do this, use this command:
force_install_dir <path>
To avoid any issues regarding the directory, just set it directly to your C:\ drive, or to some other external drive.
Example:
force_install_dir C:\gmodserver

If you want to set the path to something further than just the C:\ drive, then type out the path carefully, and make sure it contains no spaces, otherwise it will make seperate folders.
To install the Garry's Mod files, type the following command in the prompt:
app_update 4020 validate
If you have quite slow internet, then this process could take about half an hour. Fast internet however can do this quickly in just a few minutes.
4020 is the ID of "Garry's Mod Dedicated Server", not to be confused with 4000, which is the AppID of the game Garry's Mod itself. http://steamdb.info/app/4020/
To add other game content to your server(e.g:TF2, DoD:S etc.), you have to use the app_update command again. You just have to change the ID 4020 to the ID of the game you want to mount, and change the force_install_dir as well (I recommend making a folder inside the server folder which you install it into). However, it is very likely that these install possibilities do not allow anonymous login. In this case, you have to login with your steam username and password.
Automating the Process
Mostly copied from the valve developer wiki, only because it's fairly useful material.
Only useful for updating your server.
You can also automate this process. There are 2 ways to do that:
NOTE: steamcmd = ./steamcmd.sh on Linux
Way 1
Run the commands all at once:
steamcmd.exe +login anonymous +force_install_dir <path> +app_update 4020 validate +quit
If you are logging in with an account, use username password instead of "anonymous" at the +login command.
Way 2
Make a script:
// gmod_server_update.txt // @ShutdownOnFailedCommand 1 //If updating multiple servers at once, then set this to 0. @NoPromptForPassword 1 login anonymous/username password // Use either "anonymous" or login with an account. force_install_dir path app_update 4020 validate quit
Then run this script with the +runscript command in SteamCMD:
steamcmd +runscript gmod_server_update.txt
Configuration of your server
Okay, our server is now installed. Now, we have to configure it, to make it fully work, and to keep things organized.
First thing you should do, is to configure the server.cfg file. This file is used to set the Sandbox limits, and to set all console commands that are getting automatically executed when the server is booting up.
This file is located here: drive name:/Program Files(x86)/yourfilepath/blah/steamcmd/garrysmod/cfg
An example of a server.cfg file would look like this:
//The lines are used to make big spaces, since using blank spaces does not work in Steam. Replace the lines with blank spaces, or press "TAB" around 6 times to make a big space.
"hostname"--------------------------------------------"My Garry's Mod Sandbox Server"
"rcon_password"-------------------------------------"serveradmin"
"sbox_noclip"-----------------------------------------"1" //Enables noclip
"sbox_maxprops"------------------------------------"500"
"sbox_maxeffects"-----------------------------------"15"
"sbox_maxemitters"---------------------------------"13"
"sbox_maxthrusters"--------------------------------"30"
"sbox_maxsents"------------------------------------"35"
//etc.
"sbox_playershurtplayers"-------------------------"1" //Enables PVP Damage
//And you can put in some different console commands which you want to be "autoexecuted"
(guys, just a note, you don't have to necessarily use this one, it's just an example :p
the minuses are there because you can't have more than one space in a row in Steam, afaik. The spaces will work fine in any text editing program.)
Formated in a table:
hostname
my Garry's Mod Sandbox Server
Determines the server name
rcon_password
serveradmin
Sets the RCON password
sv_password
cupcake
Sets the server password
sbox_noclip
1
Enables/Disables noclip
sbox_maxprops
500
Sets the prop limit
sbox_maxeffects
15
Sets the maximum effect amount
sbox_maxemitters
13
Sets the maximum emitter amount
sbox_maxthrusters
30
Sets the maximum Thruster amount
sbox_maxsents
35
Sets the maximum SENT amount
An unconfigurated server.cfg file only contains 3 blank lines.
For better security, I recommend to put the RCON password into the parameter line of your srcds.exe shortcut with +rcon_password password.
To run your server, you must exit the "garrysmod" folder,and make a shortcut of the srcds.exe file.
Then, right click on the srcds.exe shortcut, click on "Properties", and enter this command line in the parameter line:
-console -game garrysmod +map gm_construct +maxplayers 4
The "Parameter Line" is the line, where the path of the shortcut is in; the "Target" line. Unedited, it looks like this:
C:\folder name\srcds.exe
Example: C:\gmodserver\srcds.exe
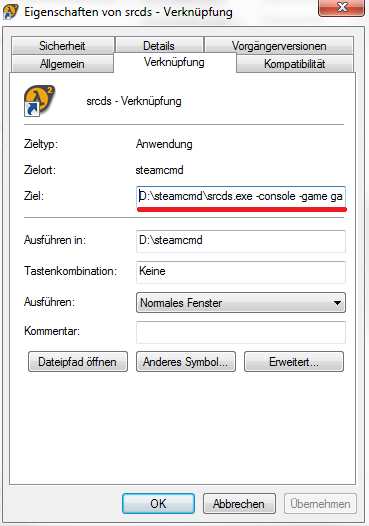
And then add the commands after it.
(Unfortunately I couldn't change the language of Windows to English, becuase I don't have the appropriate Windows 7 edition for that.)
Double-click the shortcut, and the server should run smoothly.
Port Forwarding your Garry's Mod Server
Simply doing these steps is not enough. The server seems to run, and you are able to join, but something else is missing. The server will not respond to your friends. When they try to join by joining your game, it will kick them because they "failed after 4 retries". This is because nobody but you, at the moment, has the permission to connect to your host. Port forwarding will not make your router settings accessible from anywhere, it will only make it possible for everyone to join your server, which is hidden behind a router wall.
What you have to do in steps:
1. Go to your desktop and open up your start menu.
2. Search for "cmd" in the search bar. A command prompt should open.
3. In the command prompt, type "ipconfig" and press ENTER.
4. A list of IPs, IDs and whatnot should appear. Search the "Ethernet Adaptor LAN" section.
5. When you found it, look up the Standard Gateway of that section, and remember it in any way.
6. Open up your web browser, type in the default gateway into the URL bar, and press enter. A login screen should appear, either a windows screen or a website login page.
7. Enter the login information for your router. If you don't know the information, ask anyone who knows it or might know it, or look it up on your router box. If possible, use the default login "admin", for username and password.
8. Set up the port forward. For this, find a section for forwarding ports (it's different on all router pages), and fill in all required values and information. You can set the Service Port as 27015-27016(Use 27015 only if only one port is required), the IP Address your IPv4 Address, and the Protocol "Any" or "All" or "TCP/UDP" (Again, depending on your router page).
9. Start up the port forward, and you're done.
Setting up a Static IP Address
This step is entirely optional, it is not crucial for making anything work about your server. Setting up a static IP address is explained below.
Open up your command prompt, and run the command "ipconfig /all" without the quotes. Then, search the IPv4 Address of the Ethernet-Adaptor LAN Area or something like that, the Subnet Mask, and the Default Gateway. We will use this information later.
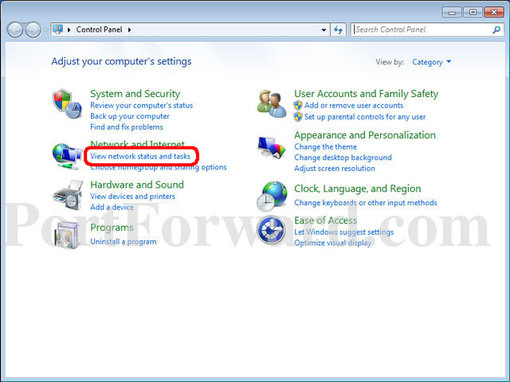
Next, open your start menu, and click on "Control Panel". Then, search the "Network and Internet" entry, and click on the button which should say something like "Show Network status".
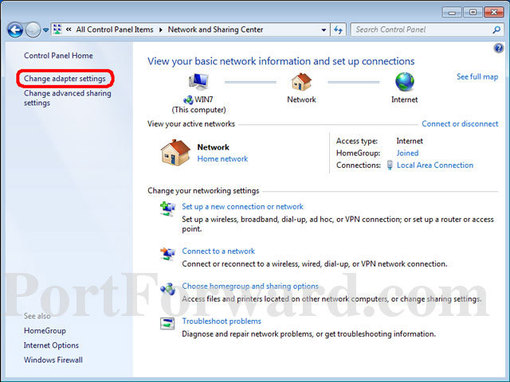
You should enter a window that shows your Networks, and "<Your PC Username> -> More Networks -> Internet".
Look at the upper left corner of the window, and click on "Change Adapter Settings".
After this, right click on "LAN-Connection", and then click on "Properties".
You should see a list of which Elements your connection uses. Double-click "Internet Protocol Version 4", and you should enter the IP Settings of it. After you have done this all, tick "Use the following IP-Address". Doing this should automaticly tick "Use the following DNS-Serveraddress:"
The IP-Address you insert is the static one. It should be very similiar to your actual IP address. Let's say, your actual IP address is 192.168.2.255 (see what I did there?). In the box, you type in 192.168.2.248.
The Subnet Mask is the one you got from your ipconfig. Same with the Standard Gateway.
Now, you have to fill out the DNS Server addresses. To get the ones you need, you can log into your Router's Webpage, and then view the Stats of your router. There should be an entry somewhere for DNS Servers.
Workshop Addons for your Server
To make it simple and clear, I listed up the steps you have to do to add workshop addons for your server:
1. Create a steam collection with all addons you want to use on your server
2. Get the ID of the collection. It's the long number at the end of the collection's page URL, /id=123456789(Right Click on collection page -> Copy Page URL).
3. Use the ID to link the collection with your server. For this, you have to add the following parameter to the srcds.exe shortcut:
+host_workshop_collection <Collection ID>
An authkey is required to make +host_workshop_collection work. You can get one here.
You can use anything as the domain name.
You need to add the authkey to the parameter line as well. To do this, use this parameter:
-authkey <your authkey>
But wait, there's more!
Well, the addons might be on your server now, but all addons that have their own content will show error signs and checkerboard textures, and missing sounds, if the player doesn't have the addon installed on their client. So we need to force a download of their content, in a way which will be explained below.
Go to your server's lua/autorun/server directory, and create a .lua file, with any name you prefer.
Here, we will take advantage of resource.AddWorkshop.
resource.AddWorkshop( "id" )
You need to retrieve the ID of all the addons you want the content to be downloaded of. This is done the same way as with your collection: Go to the addon's workshop page, and copy the number at the end of the page URL.
Once you got the ID of all the addons you need, insert a resource.AddWorkshop line for every addon that has custom content, with "id" being replaced with the workshop ID, in quotes. As an example:
resource.AddWorkshop( "123456789" )
Common and useful console commands for managing your server
This is a list of the most commonly used and useful console commands which can be used to manage and configure your server to your likings.
-gamemode <gamemode folder name> - Change the gamemode quickly (it will reset back to the gamemode set in the server.cfg file after the server reboots!)
-gamemode_reload_cl - Reloads the gamemode on the client
-banid - Add a user ID to the ban list (default way of banning people, use an admin mod for banning)
-banip - Add an IP address to the ban list (use admin mod for banning)
-sv_cheats 0/1 - Allow cheats on the server
-sv_gravity <value in number> - Set the world gravity. Default is 600
-sv_noclipspeed - Set the noclip speed. Default is 5
-sv_password - Set the server password
-sv_shutdown - Shuts the server down if it's empty
-sv_kickerrornum - Sets the lua error limit before a player gets kicked for them. (recommended 0)
-ai_ignoreplayers 0/1 - Toggles the "Ignore Players" setting
-ai_keepragdolls 0/1 - Toggles the "Keep Corpses" setting
-ai_disabled 0/1 - Toggles the "Disable Thinking" setting
-sbox_godmode 0/1 - Toggles godmode for all players generally (people will only be able to die by map events/triggers)
-sbox_maxballoons - Maximum balloons
-sbox_maxbuttons - Maximum buttons
-sbox_maxdynamite - Maximum dynamite
-sbox_maxeffects - Maximum effect props
-sbox_maxemitters - Maximum emitters
-sbox_maxhoverballs - Maximum hoverballs
-sbox_maxlamps - Maximum lamps
-sbox_maxlights - Maximum lights
-sbox_maxnpcs - Maximum NPCs
-sbox_maxprops - Maximum props
-sbox_maxragdolls - Maximum ragdolls
-sbox_maxsents - Maximum scripted entities
-sbox_maxspawners - Maximum spawners
-sbox_maxthrusters - Maximum thrusters
-sbox_maxturrets - Maximum thrusters
-sbox_maxvehicles - Maximum vehicles
-sbox_maxwheels - Maximum wheels
-sbox_noclip - Allow/Disallow noclip
-sbox_playershurtplayers - Toggle PVP damage
-sbox_weapons - Toggle spawn with weapons
Feel free to suggest any more console commands for this list.
Final Note
That was all (or well, most) stuff I know about hosting a Garry's Mod Server. If something went wrong during installing the server, then you can ask in the comments, and I, or someone else, can maybe help you solve the problem.
Please do not add me for questions, post your problem in the comments, so people with the same or a similiar problem can look up the solution if one is found. This guide is starting to age pretty terribly, and I can't continue being the customer support forever.
FAQ
Italic = Question
Bold = Answer
What is the Parameter Line?
The Parameter Line is the "Target" line you have to type the parameters in.
How to change the gamemode (to DarkRP)?
You can try this: Insert "gamemode"-----------"darkrp" in your server.cfg file with Notepad++(Replace these lines with 5 TAB-presses) if you have the DarkRP gamemode in your "gamemodes" folder of the server's garrysmod files. Or add +gamemode <folder name> to the parameter line. You can find out the folder name by opening the .gma file of it with SharpGMad.
IT IS NOT WORKING
That isn't even a question, but well. If it doesn't work, then point out WHAT doesn't work, and I, or maybe someone can help you.
When I run app_update 4020 validate, it says "no subscription" and refuses to install the app. How do I fix that?
You have to log in anonymously by running the command "login anonymous" to make it work. You seem to have forgot to do this.
When I try to install the app, I get error "Error! App '4020' is <number>x<number> after update job." What does that mean?
That means, that the directory you determined with force_install_dir seems to be invalid. It may not be your client GMod directory, use a completely different one, and make sure it contains no spaces(this shouldn't actually cause this error, but just to be safe, do not put any spaces into your directory). I recommend to use a completely new directory just for your server, to keep everything clean.
I get this error: [ERROR] lua/autorun/addons.lua:1: attempt to call field 'AddWorkshop' (a nil val
ue) when I make my lua file for downloading workshop content. What can I do about that?
Make sure the lua file is located in lua/autorun/server of your server files, and that you use "resource.AddWorkshop( "id" )" for marking all the workshop addons you want to be downloaded by the players.
My server is running, and I forwarded the port, but my friends still cannot join!
Seems like you port forwarded incorrectly. You can "experiment" with the values, try changing them a little, and it might work. I had this problem too, and I fixed it by doing this. Also, make sure that your Firewall is disabled. This isn't required for everyone, but you should try disabling it.
The server.cfg file is empty when I open it. Is there anything wrong?
There is nothing wrong if it's empty. When it's not edited, it only contains 3 blank lines. (If it doesn't, then that's not a problem too.)
How do I make myself an admin on my server?
It is strongly recommended to use an admin mod for that (ULX, Evolve, ASSMod, Exsto...), as it is much easier to handle this kind of stuff with one. If you want to go the simple, "standard" way, go to (your server's folder name)\garrysmod\settings\users.txt and add yourself as a superadmin there. (Open the file with notepad++ or similiar, as the file looks messy in stock Notepad.)
How To Create A Server On Garry's Mod
Source: https://steamcommunity.com/sharedfiles/filedetails/?id=179569412
Posted by: hughesthind1949.blogspot.com
0 Response to "How To Create A Server On Garry's Mod"
Post a Comment