

How To Create 3d Mockup In Photoshop
Create futuristic effects with Photoshop's 3D tools
In this tutorial we'll look at how to experiment with the 3D tools in Photoshop CS6 to create a stylised illustration. While these 3D tools aren't as complex as those found inside dedicated software like Maya or Cinema 4D, they're still powerful enough for simple 3D scenes, and perfect for anyone seeking the basic features.
With this in mind, I'll explain how to create a scene with a retro-futuristic look using just the 3D tools provided in Photoshop. We'll explore their features and use them to create some interesting outcomes.
What's going to be in Photoshop CS7? Creative Bloq asks the experts.
01 Start by creating a new document with a black to almost black gradient as the background, then use the Type tool to create some text – I've written '1986' in the Chrome font. Bear in mind that not all typefaces work the same way when they're converted to 3D, so the results may vary.
02 Convert your type to a vector shape (Type>Convert to Shape) and then extrude it (3D>New 3D Extrusion From Selected Path). You will be presented with a three-dimensional environment housing the common 3D tools (Move, Scale, Lighting, Rotate and so on). Feel free to experiment a bit to get familiar with them.
03 Now we will make the type more interesting. Open the 3D Panel (Window>3D) and you'll see various tabs – they're divided into Environment, Scene, Model, Lights and Camera. We want Scene, so click on it and select Lines. I've used #00ffcc for the colour.
04 I've scaled the type with the Scale tool. Now I want to make the model black in order for the lines to pop out, so select the model, go to Materials, make Diffuse, Specular, Illumination and Ambient pure black, and make sure Shine, Reflection, Roughness and Bump are set to 0.
05 Let's keep experimenting: this time create a new empty layer below the type layer (Cmd/Ctrl+Shift+N) and go to 3D>New Mesh From Layer>Mesh Preset>Sphere. This creates a 3D model from anything that you have on your layer, so it also works with images. If there's anything on the layer it will be used as a texture on the 3D model.
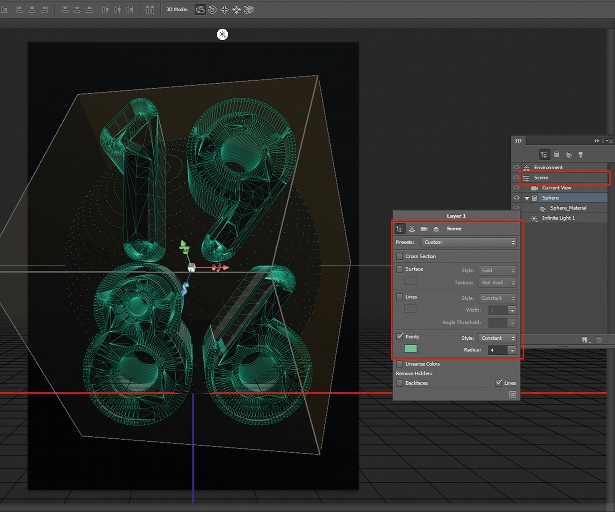
06 To make the sphere more interesting, convert it to a dotted 3D mesh like the ones seen on retro interfaces. Go to the Scene properties and check Points, change the colour (I've used the same one from step 03) and play around with the radius until you get a nice dotted mesh.

07 For the next step we'll use another interesting feature that converts an image into a depth map. This turns a 2D image into a 3D model, so make sure you choose one with some interesting details – I've opted for an image with lights. Plenty of these can be easily found on any free stock-photo website.
Current page: Page 1
Next Page Page 2
Related articles
How To Create 3d Mockup In Photoshop
Source: https://www.creativebloq.com/computer-arts/create-futuristic-effects-photoshop-s-3d-tools-9127853
Posted by: hughesthind1949.blogspot.com
0 Response to "How To Create 3d Mockup In Photoshop"
Post a Comment